Showing posts with label Americana. Show all posts

Tuesday, October 31, 2017

Boo!

Happy Halloween! Today I have a Halloween mixed media piece.


I painted one side of the back piece with Ebony Tattered Angles DIY & Decor paint. The other side I decided to use gesso and then the black paint. I then pout white glue on one side then used Americana's Purple Rain craft paint. The set it to start the cracks. I set it aside fr it to completely dry before doing the same thing to the other side. The Frame I did the same but used Americana's Margarita craft paint.


While all that was drying I took  spider Web from UmWowStudio and used Deco Art Metallic Luster in Silver Spark. I glued that to the back of the frame. I used 4 layers of foam tape on the back of the frame painted the sides of the foam tape black. and attached to the base. I took a fly that was molded from Mod Podge Mold Melts mold and used Amazing Casting resin. I painted it with Saffron Yellow craft paint by Americana. 


The top I glued a Halloween Token on top of the frame. I put a bat from K&Co border strips where the hole of the token was. 


I gessoed a witch chipboard piece from UmWowStudio and used Dylusions Fresh Lime paint using a pallet knife.  I originally wanted to use a stencil with the paint on the chipboard, but Didn't like it so i used the pallet knife and spread the paint on the chipboard. Gave it a cool texture. Glued that down on the base. The bottom of the frame I glued down the fence border from K&Co. 

I added glued 3 black flowers tot he right corner. I used one of the Julie Nutting Doll stamps and used Halloween paper pad by Paper Studio and glued it on the right side
.

I painted a small piece of white card with Purple Rain craft paint. and stamped "Boo!"  from Martha Stewart. I added 4 layers of foam tape on one side and painted the edge with the purple paint. I Glued the the other side to the left side of the frame.

To see the process of me making this watch my video. 


Sunday, January 22, 2017

Art journal page: happiest time of my life

There'  new mood board this month for Mixed media moods with DeeDee Catron and Mixed Media Jen. I did a Journal page.


I started out gluing down white backing from a decorative napkin to give the page some tooth when I went to gesso the page. After that dried I glued don Tissue paper from Tim Holtz. Once that dried I used Americana paints in Saffron Yellow (for the base layer) Dragon Fruit, and Purple Rain. I used the other 2 colors and did drips on the side f the pages. I took some watercolor paper from my stash and used Tattered Angles Plain Jane Simply Sheer in Un-Birthday on the entire page. and punched out squares. Glued them on the page. I stamped the Overlapping Squares added some splots with the Simply Sheer spray. for my focal point, I used a calendar page I placed her in between the butterfly, so it looked like she has wings. I glued down the quote that was on the same calendar page she was. Finally I added more splots with the pink and purple on the page.


Thursday, October 22, 2015

Altered box using DecoArt products Part 2

Last month I did a blog post on an box I got at good will and altering it with stuff from DecoArt. I put in the corner after I was getting frustrated while trying to make a rod for the closet so I could hang hangers. Well I got it out of the corner the other day and worked on it.

The other day I had gotten a package from MySmiley360 for my latest campaign. In the package was a speech bubble on a stick, like those photo booth prop things. I saw the stick and was like I can use that for my closet! I ripped it off the paper and cut it and it was a tad too long then i cut a tiny bit off. then it was too short! UGH! I happened to have 2 squares of chipboard from UmWowStudio. It was the right thickness needed for the rod to fit. I painted all 3 pieces in American Lamp(Ebony) black craft paint. I glued the rod to the squares. then after it dried I slid it in. No glue needed.


Next i wanted to work on the Mirror I wanted to put inside the door. I didn't have one, so made my own. I had a frame from Michael's that I got from th $1.50 bin. I used DecoArt Media Gesso in white. then painted it with Carousel Pink. I made the "mirror part by taking a pice of chipboard and cutting it to size of the mirror and putting metal tape on the chipboard. Glued that to the back for the frame. While that dried I was looking through all my flowers. Didn't see any I liked the the size I wanted for the mirror so I got out my Mod Mold of flowers and Amazing Casting Resin from Amazing Casting products. I also used some Allumilite Gun Metal Metallic Powder inside the flowers. I had some resin still lft so I quickly got the trinkets Mod Mold and cast some pieces in that mold.


While that was curing I used a little bit of the same metallic powder on the frame. Here is the before and after of the frame painted. I had 2 of the same frame. 

While everything was drying I added some trim that I got at Michael's also in the $1.50 pin. Glued the trim with Aleen's tacky Glue. I also used a wood veneer piece with my first letter of my name. painted it with the Americana Lamp craft paint. and also used some of the gun metal metallic powder on it. I glued that to the front of the door.


I also added some Wild Orchid Crafts flowers to the top of the box and a couple of black flowers.


You can see I used on of the flower pieces I casted on the bottom right of the door,

The inside of the door I glued down the Mirror using both Aleen's tacky and Crackle accents. I put something heavy on it while it dried and didn't come up. Once dried I glued down 3 of the resin flowers on one corner of the frame. on the opposite corner I used a Prima flower and leaves and 2 Wild Orchid crafts flowers. one what white that I sprayed with Bubble Gump\ pink Dylusions spray. I sprayed DecoArt Shimmer Mist in White on all the flowers and leaves. When everything dried I glued them on. 


Unfortunately This made the made the door a little top heavy. So when I go open the door to take pictures, the box tipped. So the enxt thing to work on is the inside of the box. I already started on the clothes for the close with my Julie Nutting dolls stamps. but the bottom needs something. And hopefully that will balance it out. :)

so stay tuned.... :D


Saturday, September 5, 2015

Altered box using DecoArt products

So Early this year I went to Goodwill and picked up this Armoire box. I thought It would be a good project to alter. I made those Doll cases for my cousins, and I had been wanting to make one for myself after the move, but never got around to it. When I saw this box at Goodwill thats what I thought of. So I began gathering stuff for it. I got little hangers from Joann's/ I was going to do this projecrt for a future Anything But A Card Challenge Blog. But ABAC is no more sadly.

If you saw my last Youtube Video, you saw the goodies I got from DecoArt via their Blogger program. I signed up late last year and didn't hear if I got accepted or not. Then a few weeks ago, I thought I try again. Then I realized I did get accepted. I sent them the project I wanted to do with their products Then I picked what Deco Art Products I would like to use for the project. As you can tell my project got the okay. so I started working on it yesterday and today.

Here are before pictures of the box. I started to work on it, then remembered to take a before picture. Thankfully i didn't get to far. :) And I took pictures after Every step I did (Go ME! ) so this post will be picture heavy. :D

Inside the box

 First think I did i took some pattern tissue paper crumpled it up and then Mod Podge it to the outside of the box for some texture. I did not do the inside.


I then used DecoArt  Media White Gesso for the outside of the box.

After that dried, I used the DecoArt Media Black Gesso on the inside the box and inside the door.

Next, for more texture, I used the Scribbles Stencil by Americana With DecoArt Media  White Modeling Paste on the sides and top of the box.

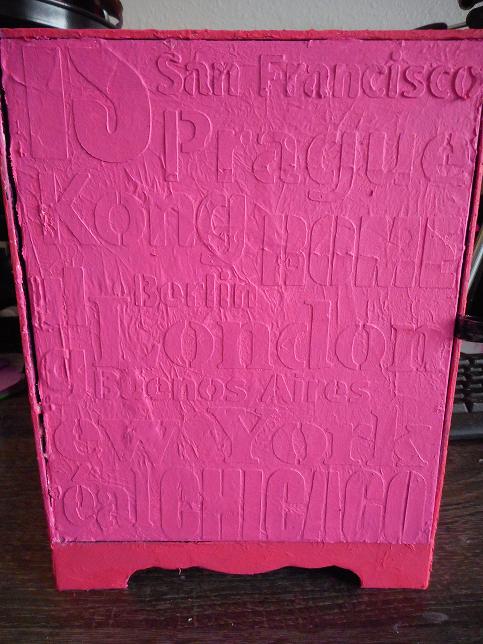
For the from door and the back  used the Bon Voyage stencil by Americana . Also using the white Molding paste.


I used Americana craft paint Peony Pink for the sides of the box. I did have do do a couple coats, to make sure everything was covered. I even used my fingers to get where the paintbrush couldn't.

The back and the door I used Carousel Pink. Again I did a couple coats and used my fingers.


The inside the door I used the DecoArt Media Black Molding Paste and the Scribble stencil. Leaving it as is. I'm sure I will add something to the back of the door. maybe a "mirror" or something.


Back to the outside.  I put a little dab of Americana craft paint in Lamp (Ebony)Black on a plastic lid and sprayed some water. Itook a paint brush and did splots and splatters on all sides of the outside of the box. I had splots everywhere! My desk, things on my desk, my arms, my face, my glasses! Looks cool, though I don't like the dripage that happened on the front door, LOL 


Finally I sprayed DecoArt Media Shimmer Mist in white. I spayed far up and I did while it back, I wanted the shimmer.


I started working on the inside. I cut a shelf out of scrapbook paper and then punched holes on both sides of the folds where I scored it. I ran wire through the hole as the rod to hang the hangers. but it sagged when I put them on. I also had a heck of a time trying to figure out the length and width of the shelf I needed. I was getting totally frusterated that it wasn't working. So I ripped the shelf out and put in the corner for a time out til we are on speaking terms again. So stay tuned!