Showing posts with label Julie Nutting. Show all posts

Monday, July 31, 2017

ICAD 61

Today is the last ICAD for 2017! This one went through stages too. I guess I was over the ICAD thing. lol


I had glued lace onto the index card. Then painted it green. then I went trough stages til I was happy with I got. I used a Julie Nutting doll stamp. Around the edges I used a pink Gelato. And added a quote. 

Monday, May 2, 2016

Color me positive and journal 52 week 16

Here are my pages for week 16. In the coming weeks Youtube videos on me working on these pages will be out.

Color me positive week 16 


Journal 52


Thursday, March 17, 2016

your a mermaid

Here is my project I did for the March Virtual art crawl ##CACFantasyArt on YouTube. I LOVE how this turned out! I wasn't going to participate in this months art crawl, as I'm not into faeries and such, and had no clue what to do. Then I remembered that I had some of the Julie Nutting mermaids that a friend stamped for me(I don't have that stamp....yet). And I had just gotten a sentiment from VLVS! that I got just for that stamp. So I deiced to play. To see the video of me making the postcard go to my youtube channel.


I used part of a mailer from a casino as my base of the postcard. Okay its not really a postcard. it bigger than a postcard. I used Deco Art mixed media white gesso. I then used Folk Art Patina craft paint and pool blue by Craft Smart. After it dried I crumpled up and then glued tissue paper on top with Blick's matte medium. I used some Liquitex glass bead gel. Lot of texture going on.

After all the gel dried I sprayed Mr Huey's Cash money and Powder blue and Deco Art media white shimmer spray. and a little water to help the sprays move a bit. It too some time to dry. and I find the Mr. Huey sprats a little tacky when its wet and even when its somewhat dry. when its completely dry its not tacky anymore.When it was dried I used some Inka Gold in gold all over the post card. I used a travel screwdriver to get the paste out of the jar. I had a shell necklace from when I was a kid that broke, but kept the it to use in art. I glued that to the postcard with Aleen's tacky. 

I colored the skin of the mermaid with Prima markers in the light skin tone. The rest I used Inktense pencils. I later used Artist loft pearlesnt watercolors and painted her tail, bust and hair, just to give it some shimmer. I also use Glitz glitter glue in Mermaid and confetti in different areas of the postcard. Also use the confetti for her headband. I used foam tape to put her on the card. I did have to use glue on that,as the stick on the foam tape wasn't sticking that well. I stamped the sentiment from VLVS! on white cardstock with black Versafine ink pad. and again I used foam tape on that as well.


Friday, February 19, 2016

Coffee tag for Secret Sister

I hosted a Secret Sister swap that is still going on. Packages are getting mailed out. This time I participated.  My secret Sister got her package last week and showed it today. So I can no blog about the tag I made her.


I started with a Prima tag. I worked on the background a lot. Not liking what was hapening. I set the tag aside and was working another tag. I liked what I did on that tag, So I did it to this tag. I painted the whole tag black. Once dried I painted  part of the tag purple. I then put the chunky circle over the wet pant. I took a baby wipe and wiped the paint off. I then did the other part of the tag. It was too dark so I added some white through a punchenilla. The hexagon Chipboard piece is from UmWowStudio. I just painted it purle. I used Wood glue to stick it on the tag. I cut the extra piece that were sticking out and glued them on the tag.

The Julie Nutting girl I stamped on book text and use the Prima light skin tone markers Her hair is Neo color 2's. The water brush had some pearlesent water colors still on the brush, so her hair is sparkly. lol. I used scraps to dress her. The Frapp is a Silhouette cut. And the sentiment is from VLVS! I used black seam biding for the top.


Sunday, November 1, 2015

Coffee Coffee Coffee

In September a Hobby Lobby not to far from my house opened. I didn't get there til a couple weeks ago. Its Huge! I did a quick look around and the only thing I got was the On the Go texture fade. I came home and made a card.


I did a technique that Jennifer McGuire did a month a so ago, but instead of using Distress ink pads I used Dylusions paints in Bubble gum pink and Vibrant Turquoise. I wanted to see ho the technique did with paint. After I put the paint down I brushed on pewter Perfect Pearls. Then I placed the cardstock in the texture fade and ran it through the big shot. 

I stamped the Julie Nutting doll on book paper colored her with Neo Color 2's and then dressed her in scraps. I took a piece of cardstock that I had dragged Dylusions ink a while back and ran the texture fade in the big shot. I cut a coffee cup out and glued it to her. A morning without coffee sentiment is from Viva Las VegaStamps! After that was put together I put the piece on a white card base.


Sunday, August 2, 2015

Anything but a card challenge 50: Celabrate

We are in a celebration mood over at Anything but a card! Celebrate is the them for this month.


For my project this month I created this birthday....well I don't know what to call it. It's not a card, as this is Anything But a card challenge blog. The inspiration of this piece was the birthday dice cut that I cut out on my Cameo that I FINALLY unboxed once I got my new desk. After playing around with it as a stencil. I sprayed the whole thing with Dylusions Cherry Pie spray. While that was drying I got out three Julie Nutting doll stamps. Stamped them on book paper with black Memento ink pad(I can;t find the ink pad since!) Colored their skin and hair with Neo color 2's/ I dressed them in papers from American Craft Hip Hip Hooray collection. The tip of the hat I originally used Diamond Stickles, but too much of the background still showed through. So I used some Recollection bling from my stash.

The base if this piece is on a 8x10 mat board. I used the white side of it. When the die cut was fully dried I put foam tape on parts of the die cut and set it on the mat board. Then I added foam tape to the girls. Before putting them on the mat board I thought they needed to be holding balloons. I stamped these hears from Art Gone Wild (from back in the day) from the scraps I used when I dressed the girls. Cut them out and on some of them I used Stickles. Stickles I used are Diamond, Black Diamond,Yellow and Mermaid (that one is Pure Glitz). When those were dried I used some twine from Target Dollar spot for the balloon strings. I glued the balloons to the girls. I attacked the girls to the mat board. Before I attached the balloons to the mat board I made sure the strings were tight and not loose as I put them on the board. I cut off access strings.
I then added some sequins through the board and some bling. I then glued down a sucker that was part of the mod molds from Mod Podge that I used Amazing Casting Resin and painted it with Barn Door Distress paint. and added some pewter Perfect Pearls to.


Be sure to check out Anything but a Card challenge blog to see what the other Designers are doing.

Sadly this is the last Challenge for the blog. :(  I would like to thank Susan for inviting me to be part of this team 2 (or maybe it was 3)y ears ago. Its been fun!


Monday, July 13, 2015

London Bound card

In my last post I showed 2 tags that I made for a couple of friends who are going to England. I made a card for another friend who is also going to England with the 2 other friends. Really loved how it turned out!

The card base is Black card base from Recollections. The decorative paper is from Newsworthy by Paper Studio from Hobby Lobby. I used  Jill the 60's Julie Nutting Mixed Media stamp. Stamped her on book paper with Versafine ink pad. Colored her with Neo color 2's. I dressed her with a piece of of Travel Girl 8x8 pad and a piece of 12x12 Boarding Pass by October Afternoon(I've been treasuring both of these collections. But I took a breath and  used them. LOL) The dog I stamped with Coffee Bean Brilliance pad on book paper. colored him with Neo color 2. and dressed him with the same papers. I used my Dymo to write out "London Bound". With my Cameo i cut out a teeny tiny donut that I colored with Gathered Twig and Picked Raspberry distress ink pads. I put Glossy Accents on the frosting.  and I also cut out a teeny tiny coffee to go cup I colored that with salty Ocean and Barn door. So Stickin cute! 


Sunday, July 5, 2015

Anything But a Card Challenge 49 Open theme

Hope everyone is staying cool this first week of July! This month the theme over at Anything but a card challenge blog is open theme. Which means you can do whatever you want! Just do not do a card! :P


For my project this month I made 3-D Dress form. I saw the tutorial from MsLiberty25 on youtube. Be sure to check her out. I linked the video tutorial on my Youtube video on this project.


For the dressform I used cereal box and book paper for the dressform die. Also i piece of scrapbook paper. I inked all the book pages with Picked Raspberry distress ink pad. can you tell this one is for me?  LOL

The box is a candy box that I painted with black craft paint two coats to make sure I got good coverage. While that dried I put together the dressform. After it was put together. I glued it to the lid of the box with Helmar 450 Quickdry.

Around the bottom of the dress form I glued a couple of Julie Nutting dolls wooden charms. I just cut off the hole where its a charm. I glued all the spools that came from when I was cutting the dress form out, and gled them together. I glued the scrapbook paper die cut of the spool on top and edged in pink craft paint. I also one of the many pink flamingos I have gotten from Viva Las VegaStamps! orders, and a rose that was made by DeeDee Catron from when she first started UmWowStudio and made handmade flowers(which she no longer does). I added a chain with a couple of charms to the dress form.


The I ran through my stash and grabbed pink, black and white buttons and some other odds and ends stuff. and glued them to the lid.  I took some seam binding that the wonderful ArteDar sent me last year and glued that around the edge of the lid. Then I took the black lace trim and used Glossy accents to glue that down.

The original reason why I saved the box was to make a shadow box with it. Well that idea sort of went out the window. I did do something the inside of the box. Turned out so cute!

 The background paper I used is from The Create Collection by Recollections . I stamped the Mama's day on white cardstock with Black Versafine ink pad and embossed with Ultra High Gloss embossing powder. I colored her with Crayola makers. I took a water brush and went over it. I did use foam tape to attach her on the the background.  I did glue down another flamingo ( I have LOTS of them! ) and a cow brad(no reason just cause it was cute. LOL), I just took the brad part out.


This corner I used another black rose and I took 2 molds that i made from the Trinkets mold from Mod molds by Mod Podge using Amazing casting resin from Amazing products. The skullie I used the pearlesent powder on the mold before pouring the resin. I did use foam tape on them but also glue to attach them to the back.


Be sure to go to Anything but a card to see what everyone is doing and link up your project to the blog!


Sunday, June 7, 2015

Anything But a Card Challenge 48: 'Out and About

Hey Everyone welcome to another challenge over at Anything but a Card. This months theme is Out and about. I altered this plaque that is from Oriental Trading Company.


I glued down a couple napkins with matte medium then I did a couple layers of gesso. I cut some pieces of cheap dry wall tape that I got at a dollar store a few years ago. I then painted he plaque with pool blue craft paint. I used a harlequin stencil with pink craft paint, and plastic canvas with a turquoise Dylusion spray. I took the black Dylusion spray I opened the bottle and just taped the sprayer to get splots. The Eiffel Tower is also from Oriental Trading Company. I painted it a different blue and put some Jasmine Silks to it and some Inka Gold. I did put some of the Silks on the plaque to tie the two together. I painted the edges with black craft paint.
I stamped Audry, the Julie Nutting stamp from Prima. Stamped her with black Versafine ink pad on the Buff paper pad. Colored her hair with crayola colored pencils. Her dress I used Uncharted matte stack by Paper Studio by Hobby Lobby. Cut out and glued the pieces on her. I then glued with Helmar 450 Quick dry the Eiffel Tower to the plaque and then attached Aurdry with foam tape.I added some Black Diamond Stickles for her belt. I cut a little bit of beaded trim and glued it to her as a necklace. I stamped Bonjour from another Julie Nutting stamp set. 


Be sure to check out the blog to see what everyone else in our Design team did. and come play along!

Sunday, April 5, 2015

Anything but A card Chalenge 45: Fool's Gold

This month's theme for Anything but a card challenge blog is Fool's gold. Metals, gold or a fool. I had a project in mind for this theme, but I couldn't find what I was looking for in time so plan B.


I did a journal page. The page had some left over Teal Dylusions spray on it. I went through my napkins to see if I had anything gold. I did so Glued that down with Claudine Helmuth's multi-medium. The color from the Dylusion's spray was coming up which I knew it was going to do that, so I was okay. After that was dried I sprayed more of that Dylusions spray through a stencil. Heat set it and then I grabbed my glass bead gel and the circle stencil from UmWowStudio . I let that sit over night. The next day I took a gold gel stick from Faber-Castell and went over the edges of the page. Also to it to the circles. I was starting to look like a hot mess. 

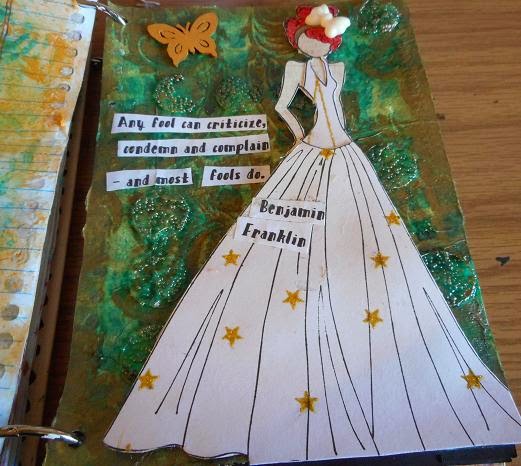
I then took one of my Julie Nutting doll stamps and stamped her on some gold glittered paper from Studio Calico. cut out and glued her to her body. I was a little ticked that I got glue on her dress and made it worse by trying to get it off. I knew I would have to cover that up. I found a quote about fools.  printed it and cut it up and glued it to the page. As you see I put the author of the quote on her dress. lol I added a bow to her hair band. Its made using a mold by Mod Podge and Amazing Casting Resin.  The butterfly is a wood piece by Prima and colored it using gold Inka Gold.


Don't forget to stop by the blog to see the other Design Team Members are doing. And play along!

Saturday, December 6, 2014

Anything but a Card: challenge 42- Celestial

This month's theme over at anything but a card is Celestial.  The moon, the stars, the sun, or what you think celestial is.

I'm still in the apartment and my stuff is in storage ( This is the last time in saying that) So all my suns, moons and stars rubber stamps are all in storage in cold Chicago. But I did manage to do a celestial project.


One of the weeks of Documented life the prompt was Stars. I stamped a Julie Nutting stamp on newsprint. painted her skin an hair with Neo Color ii's. I then stamped her outfit using Lady Bird 6x6 pad by Prima. After I dressed her I used the scraps for the stars. I just drew stars on the back of the papers and then cut them out. and glued them to the planner pattern side up. then I glued on the girl. I added some washi tape also the same collection by prima. I outlined the stars with a black Bic pen. and I added a crown sticker to her.


Saturday, October 4, 2014

Anything But a Challenge 40: autumn magic/spring wonder

This months theme for the challenge over at Anything but a card challenge blog is Autumn magic/spring wonder depending what part of the world you are in. I did Halloween.  As you guys know I just move out to Las Vegas last August. We still haven't found a place yet. All the places we looked at the bedrooms are small not enough room for our bedroom furniture let alone my craft stuff! I was smart enough to bring with me my Halloween stamps from Viva Las VegaStamps! when I was packing some craft stuff to take with me in the car for the road trip. Because I knew I would be doing something on Halloween for the blog.:)


I did a journal page for this months challenge. I used a scrap of paper (nightingale from Colorbox) that I used for another project I was working on. Cut it to the size of the journal pages, but a 1/4 smaller. i used my distresser tool to distress the edges. The journal itself I used pink water color to paint the edges of the white paper. I then stamped the fence, moon and bats broom Viva Las VegaStamps! I took the tree background stamp and only stamped the branches on the left and right side of the paper. I stamped the witch falling off the broom. I had the girl witch and pumpkin (prima Julie Nutting) left over from cards I was making and decided to use them for the journal page. I then stamped the "Witching hour" and "Life is a witch and then you fly" Both from Viva Las VegaStamps! on scraps of the gray paper as the background. When the page was done I used Mircal tape to attach it to the journal.

Be sure to go to the Anything but a card challenge blog to check out what our DT is doing and play along!

I'm also going to enter this in the Viva Las VegaStamps! October monthly challenge.


Saturday, September 6, 2014

Anything But A Card Challenge 40 STEAMPUNKtember

Its another steampunk challenge over at Anything But A card Challenge blog.

I am not a steampunk type of girl so this was a real challenge for me. But I think I pulled it off. 


The journal I used is from Prima. The pages are single sided so I used the back side of one of the pages. I cut a piece of 12x12 paer from Timless Type from DCWV. I cut it a little smaller than the page in the journal so there's a border on the page. I distressed the edges with my scissors. I used distress stain in Antiqued Bronze on the page in the journal so it wouldn't be white border anymore. I took theTarnish Brass around the distrssed edges of the Tatter Type paper. I used an empty ATG tape roll to use as a stamp. I put some Brushed Pewter distress stain on a stamp block added some water and used the plastic tape thing as a stamp. I also used some of it for splatters and drips. 

I cut the hot air balloon from the Cartogpher collection by Prima. It was in the ATC pad, but the pad is really 41/2 by 6 1/2(or somewhere around there). I found my Journal cards from the Craftsmen collection. I cut the boarder from one of the cards and glued them to the left side of the paper.

 I used Priscilla, the Julie Nutting stamps from Prima. I stamped her on the Buff paper pad with black Versafine ink pad. I dressed her with 3 of the Craftmen journaling cards. I painted her hair and part of her boot with Inktense color pencil. The band on her hat is Gold marker from American Crafts. I glued her on the paper. I then added some more splots from the metallic distress stains. I then glued that page to the Journal. Then I let it sit. I know it needed something else. I didn't feel like digging in my stash for my gears that were cut on foam for stamping. 

When I was dog sitting in June I went to Michael's and saw that Mod Podge came out with new Mod Molds(and new Mod Melts) I picked up the industrial mold to use for this. And I finally used the Amazing Casting Resin and 2 of the Alumilite powders that I won from Amazing Mold Putty back in December.

Here I set up my mold. I used the Allumilite Bronze and Gun Metal powders with a paint brush.


what the bottles look like when I look them out of the box

What part A and B look like in the little cups.

What it looks like after you pour into a plastic or paper cup, and stirred. Side note this get hot! And the more you stir the hotter it gets. and it sets up really fast.

This is what it looks like when it sets up. Its white. I had some left over resin and I was going to pour into the clock with this batch but the resin that was still in the cup set up by the time I finished pouring powder in it. So I had to make more and used the other mold I got to see what they  looked liked. That set up while in mid pour. Was wild. LOL

And this is what they look like out of the mold. You can see I didn't get enough of the powder on the clock.

Once those were don While still warm and pliable. I trimmed the ones that needed to be trimmed. I used 2 of the small gears and the clock. I was able to glue them to the page with Aleen's Tacky.  I went to word pad and useing Type Keys Filled font and typed Party like its 1899! cut it out glued it to the page. Colored the white showing with gold color pencil and Finally used Glossy Accents on the keys.


So be sure to check out Anything But A Card challenge blog to see what the other DT memebers are doing and play along! And don't forget ABAC is having a DT call! Deadline to send in your application to amazingcrafting at yahoo dot com is Sept 13! All the info about the DT call can be found here