Friday, February 28, 2014

Febuary ARC

In Mid January Darcy challenged us in the ARC Facebook group to find a book we have read before that we loved, and reread it. Well all the books I have read and loved are now gone to used book stores or friends. So it was off to find one from Media On Demand (online library for E-books). But First I went to http://www.shelfari.com/and look through the books I have read shelf to get an idea what to reread and to see is the Media on Demand had the book. After a couple of tries I settled on A Pedigree to Die For by Laurien Berenson. The 1st in the Melanie Travis Mystery series.


The series starts with Melanie is a single mom of 4 year old Davey. She was married but now divorced. She got a call from her brother, Frank that their Uncle Max had died. Uncle Max  and his Widow, Aunt Peg own and show Standard Poodles in the dog show circuit. Besides Uncle Max died of is to believe to be a heart attack One of the poodles are missing, one of Aunt Pegs favorites, Beau. Aunt Peg asks Melanie to find the dog. Along the way we meet another standard poodle breeder Sam Driver. and other groomers/handlers characters in the series.

What I love about this series is learning about the Standard Poodle breed and the dog show circuit. I learned a ton. the main characters are great. Not one that I do not like. 

There are 16 books in the series. Laurien did take a break from this series after book 15(I  was said when I found that out) but last year I learned she deiced to pick up where the series left off.


The art work is a journal page done in my small Dylusions journal. I had sprayed every other 2 page spreads with Dylusions sprays.  The corners I used a Dylusion stamp. I stamped 3 poodles from Viva Las VegaStamps! The stands are scraps of scrapbook papers I had laying around. I wrote the title on another piece of scrap paper and cut and glued on the page.


The book I will be reading for March is "Shoulda Been There" By Jude Southerland Kessler


Monday, February 24, 2014

Letting the paper speak for itself


Here is a quick card I made using Prima's Nature Walk. I cut it so I could get the pixi for the card front. I did put some glossy accents on some parts of the paper to add some texture to it.

The inside I used the other side of the scrapbook paper. and stamped the sentiment from Bugawamps.


Journal pages

I've done quite a few pages in my small Dylusions Art Journal. Not going to go into detail, just going to show the pictures. :)


Documented Life Weeks 8 and 9

Last week the prompt was add a flap to the flap. Well my flap is on the opposite side of where everyone else flaps are.(dose that make sense) So I made 2 flaps to my journal page. I used DCWV Fame Fatal papers. The imaiges are from a Life Magazine book that i got from the used book sale at my library a couple years ago. They are black and white imags. And I colored parts of them with my neo color 2's.


The other side of the flaps I tried out some watercolor crayons and some new stencils/masks I made with my Hot Marks tool and transparency.

the main page


This page of my junk journal had 2 little pages in it. I doodled on one of them both sides. they other I doodled and stamped and smashed.


This Week-Week 9 It was collage something you recycle. At our Jewel (Albertson's in some parts of the country) They have a monopoly game. I had a ton of duplicates, instead of tossing in the recycle(after seeing of someone else needed any) I glued them on the page. Then sprayed and painted the background. Added some stencils. Added a pocket which was a library pocket from a book I had gotten from the library book sale and took off. Covered it in scrapbook paper and sponged some stencils on to that. glued it on the page. I added another stencil I made. And then a quote by Marilyn Monroe I was going to use on journal page but added it here.


Friday, February 14, 2014

Product Reivew for Buzz Agent: Schick Hydro Silk Razor for Sensitive Skin


I'm finally review the Schick Hydro Silk sensitive skin razor That i got for free to try from Buzzagent.com. I wanted to wait til I got the Skinmate shave Gel before I wrote the review. But I haven't been able to go anywhere they might have it. As you know this winter has been the pits! It is going to warm up soon, so I hope to walk to Walgreen's and pick it up and then do a review of it.


So far I used it twice. the first time I just did the underarms to try it out. Remember I wanted to get the shave gel before i tried it on my legs. I am always leery of a new razor. Always afraid to nic myself. The razor felt smooth and did the job. didn't felt the 5 blades at all. and it did the job.

Tonight I did the legs. I used a shave gel from Dollar Tree. Again I didn't feel a thing. and the razor did its job.


The packaging was very easy to open. The cap on the razor was very easy to open and close. Great for traveling. When I change the blade, i will let you know in a later review. I thought I took a picture of the razor with the cap off. But when I change the blade I will take a picture and put in this review. 

Depending on the price and if I have a coupon, I would get the product again.

Monday, February 10, 2014

Scrappy Bowl Sunday

For the past few years Kathryn formally Kathryn from Scrap beach, has a scrappy bowl on super bowl Sunday. For the last couple years they challenges were up on her blog, this year it was on her Facebook group. I participated in 3 of the 5 challenges.

The 1st challenge was make a project using grids. Here is the card I made.


Paper I used was from Basic Grey Fiction (or was it Fact, i don't remember) I cut the 12 by 12 in to 4 6x6 squares. The girl is from C.C. Designs (stamped her on a piece of the Prima paper pad for the Juile Nutting dolls. It was a scrap)and I paper pieced her dress(from the other side of the grid paper) and socks. I stamped the grid washi background stamp also on the other side of the grid paper. The cupcake, candle and happy birthday are from Technique Tuesday. colored with No color 2's.

The next challenge I did was making a project using either Bronco's or Seahawks colors. I made a card with the Bronco colors.


Card base is white Recollections card stock. The blue paper is I think from TCP Studio. It was given to me in a RAKI stamped the Julie Nutting girl on the "Buff" paper pad. Her clothes I used Fame Fatal papers. Made banners from the scraps of the orange paper. The happy birthday is from Technique Tuesday.

The last challenge I did was layers. This challenge I won! I won a 12x12 Graphic 45 Couture paper collection. 


White Recollection cardstock for card base, The scrapbook paper I used for the layers is one 12x12 from TCP studios. I used both sides. The Julie Nutting doll I used another paper from that collection. And same Technique Tuesday stamp set.


Saturday, February 8, 2014

Anything but a Card Challenge 32 Tic Tac toe 3 in a row!

Well its February and its the week of Valentin's Day/ I have a love/hate relationship to this holiday. This month at ABAC we are doing a Tic Tac Toe board for the challenge. Just like the game you choose 3 items from the picture in a row for your project: Up and Down, Across, or Diagonally.


1.) Red
2.) Recycling
3.) Glitter {can be loose or like Stickles}
4.) Bling it ON! {beads, gems, buttons, sequins and baubles - the sparkly bits}
5.) Heart
6.) Sprays and Mists
7.) Ribbons, Fibers and Trims... oh MY!
8.) Black
9.) Lace


I had a Chipboard heart album in my stash for a while and decided to use them, not as an album but just to decorate them as is.  I gesso'ed one side of them. After they dried I did stack a pile(and i do mean a pile) of books to try to get them flatten, but they are still kinda curved.

This is the 1st one I did. 

I went diagonally with this one. I did Red, Heart and lace. I painted the heart red. layer was a water down red craft paint. then I I did a layer of another red craft paint. I then took a stamp of circles and stamped them on the heart with black Menento ink pad. I then took a piece of lace placed it over the heart and sprayed with Linen White Dylusions spray. I then stampeded the Valentine's day background stamp by Rubber Baby Buggy Bumpers(oh how I miss them) with the same black ink pad. I took Lindy's stamp gang Screaming Banchee black that is also mixed with black SEI tumble dye and water and did drips. I took the pic of Mickey and Minnie from a book I had and cut them out and glued them to the heart(I really wanted Cinderella or Snow White but either story showed them with their prince) I had gotten these heart gems from Dollar tree and I glued one with glossy accents between the 2 of them. I used black craft paint to paint the edge of the heart.I then uses my Dymo label  and punched out "be mine"


Here is the 2nd one I did. I did Recycle, heart and black. and I remembered to take pictures of the the process! Yay me! :P

I first took Distress ink pads in Black Soot and Barn Door and stamped them on the heart. I took a black crayon and wrote down anti-valentine's day words. i then took the water down red craft paint and spread the paint with my fingers. the distress inks went away since they are water base. OPPS. :P

I then took red craft paint and went over that. Yeah I know I said black was one of the things I things in the tic tac toe board. just wait. :)


Next I took some black scrapbook paper and  tore pieces of it and glued them to the heart. I took a black Bic pen and doodled broken hearts. I Then took an old magazine (recycle)I had and found a page that has some black in it at tore and glued that to the heart


Next I painted the heart with black craft paint. Yeah, I know I didn't have to use black papers since I was covering it up with black paint. But that what I wanted to use in my head. I then took some big circle punchenilla and sprayed with the Lindy's stamp gang Screaming Banchee black that is also mixed with black SEI tumble dye and water. Not that you were able to see it when it was dried. I wanted that little shimmer. I then took smaller circle punchenilla and the Cherry Pie Dylusion spray. Then I took the heart punchenlla and the White Linen Dylusion spray and it brought out the red when the white dried. Finally I took the Black Dylusion spray and sprayed some more circle punchenllia and tipped it so I can get some drips.


I went looking through the kids book again for something for this one. I saw this picture of Minnie crying as Mickey leaving, and I had to use it. All these thought of saying went through my head of what she would say. Of course those thoughts left me when it was time to write something down.  I took the Dymo again and punched out "Don't go breakin my heart" and "please don't go" and put them on the heart.


So go to Anything But a Card Challenge blog play along and link up!

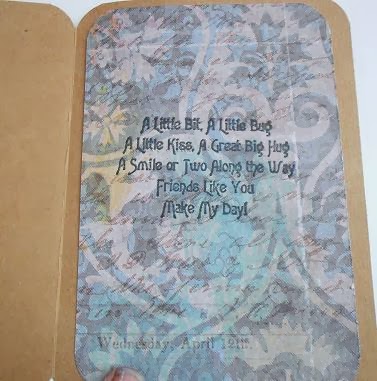
Happy Valentines Day!


Monday, February 3, 2014

playing with paper mache

For the past couple of days I've been working on Lesson 10 of Soul food. Lesson 10 by Sarah Hand was a Paper Mache shadow box shaped as a house. After I put the house together with a used small flat rate priority box, Viva Las VegaStamps! put out their monthly challenge board on their blog.


I When I saw the colors I thought this challenge was made just for me! :) That's when I decided to use the paper mache house for the challenge.

Here is the house after I paper mached it and it dried. When making the glue, I think I put too much water to make the glue. but it still worked out.

Yeah I know the left side is a little caved in a bit. I let it go. I then painted a base coat of light ho pink craft paint, then I painted a top coat of Magenta. After it dried I took the row of chevron stamp and stamped it on the sides with black craft paint. For the roof, I wanted to do molding paste with a circle stencil, but that was not working out for me at all. So I scrapped the molding paste and repainted the top and stamped the chevron. (yeah I know there is molding paste on the side. I was trying so hard get that off.)

Then for the inside I painted it with wicker white craft paint. I did water it down in some places. It was time to gather stamps and paper. I had it all planned out in my head, and it looked cool in my head I tell ya! LOL


I took 3 sheets of scrapbook papers and with circles template I traced and cut out the circles, but them to the side. I stamped the whimsical clouds, trees, and potty people on white cardstock with memento ink pad. I did color the clouds with a pink Neo color II, because I thought they needed some color. I glued the clouds on with Aleen's tacky.I then took the circles and with foam tapes I put foam tape in various numbers for thickness. I then placed the potty people with foam tape. I then glued on the trees. I had some Wood Veneer  pieces in triangles, diamonds and circles. I took 11 circles and painted them in pink and black. and glued them on the background with Aleen's. It still needed something so I stamped the chevron banners on white cardstock with black Memento in pad. I carefully cut them out and glued them to the edge of the roof. Then I called it done til this morning. I knew it needed a sentiment. So I went downstairs this morning looked through my VLVS! sentiments. Then I found some other things to put on the box. like the Crown and the heart from Tim Holtz. And of course a pink Flamingo from VLVS! when you get an order from them. I used glossy accents to glue the metal pieces and the Flamingo down. Stamped the sentiment on white cardstock and glued part of that to the circle. Then I called it done.


VLVS! Stamps used:

Chevron banner
line of chevrons
whimsical clouds
whimsical trees
man and woman symbol
I never knew what happiness was until I was married and then it was too late!


Saturday, February 1, 2014

Have a sticken cute birthday postcard

I made this post card For Dede(Inkwell) for her birthday. I did Did these type of thing before. Its from the book Kaleidoscope by Suzanne Simanaitis. 


The project that's in the book is so easy to get backgrounds done. The focal image is from a kid's book that I got at the thrift store.


For the sentiment I used a white chalk marker that I got at Target in the dollar bin. I went around the letters with a black pen and then colored the letters with a Sakura Gelly Roll  in clear star. I outlined the edges with black craft paint and backed it with scrapbook paper.

Items used:
cereal box
gesso
black soot and barn door distress ink pads
crayola crayon
craft paints
black bic pen
scrapbook paper
magazine page
Train tracks from Viva Las VegaStamps!
stencils and punchenllia
book image
aleen's tacky
white chalk marker
black pen
Sakura Gelly Roll pen clear star