Showing posts with label UmWowStudio. Show all posts

Saturday, January 20, 2018

I'm taking a free year long class via Facebook called Sole Journey 2018. Last week the first lesson posted, taught by Fiona Paltridge. This was my take of her project.


items used:
Denim 
Cereal weight chipboard
gesso by Utrecht
Bubble Gum pink Dylusions paint
Stencils from UmWowStudio
Tater Angles Decor & DIY paints: Silver and Ebony
Snow White American craft paint
ephemera
mono print papers
Tim Holtz :paper Dolls
Butterfly on ivory from Canvas Corp
Black Diamond Stickles
green trim by Prima 


Tuesday, October 31, 2017

Boo!

Happy Halloween! Today I have a Halloween mixed media piece.


I painted one side of the back piece with Ebony Tattered Angles DIY & Decor paint. The other side I decided to use gesso and then the black paint. I then pout white glue on one side then used Americana's Purple Rain craft paint. The set it to start the cracks. I set it aside fr it to completely dry before doing the same thing to the other side. The Frame I did the same but used Americana's Margarita craft paint.


While all that was drying I took  spider Web from UmWowStudio and used Deco Art Metallic Luster in Silver Spark. I glued that to the back of the frame. I used 4 layers of foam tape on the back of the frame painted the sides of the foam tape black. and attached to the base. I took a fly that was molded from Mod Podge Mold Melts mold and used Amazing Casting resin. I painted it with Saffron Yellow craft paint by Americana. 


The top I glued a Halloween Token on top of the frame. I put a bat from K&Co border strips where the hole of the token was. 


I gessoed a witch chipboard piece from UmWowStudio and used Dylusions Fresh Lime paint using a pallet knife.  I originally wanted to use a stencil with the paint on the chipboard, but Didn't like it so i used the pallet knife and spread the paint on the chipboard. Gave it a cool texture. Glued that down on the base. The bottom of the frame I glued down the fence border from K&Co. 

I added glued 3 black flowers tot he right corner. I used one of the Julie Nutting Doll stamps and used Halloween paper pad by Paper Studio and glued it on the right side
.

I painted a small piece of white card with Purple Rain craft paint. and stamped "Boo!"  from Martha Stewart. I added 4 layers of foam tape on one side and painted the edge with the purple paint. I Glued the the other side to the left side of the frame.

To see the process of me making this watch my video. 


Sunday, July 30, 2017

ICAD 60

This one does not have a video, I started to film it, then after taking a break, I was working on the card again and thought I hit the button.... I didn't. This one with went through stages...lots of ugly stages. Again I used the colors from the Mixed media mood board.


I used the Desert Turquoise, pink and yellow and white. Kept layering with stencils til I was happy. The yellow I used with some corrugate as a stamp. The Thistle chipboard piece is from UmWowStudio. I used from Deco art Metallic Luster in Brilliant Turquoise. This stuff is so creamy. its great. Glued it on the card, then added a quote.

Friday, July 28, 2017

ICAd Day 58

I hope to do a slide show post of the ICADS I did for this year at the end. I have done videos for all most all of them every day Ok I will confess, I have been doing them in bunches ahead of time, then edit and then scheduling them for the day they are to be up. Saves headaches of ding one a day and rushing to get it edited and up at the day they are to go up. I don't think i would be doing it then, takes the un out of it for me, thou that is the idea doing a card every day.

Anyway onto the ICAD!


I used the colors that are in the mixed media mood boards (well as close as I could. ) The background is a like a stencil. Its from recollections, part of their Bohemien collection. I got it last year. It comes in 5x7 pad, i got the pad to use as stencils. It was on my desk so I deiced to glue it to an index card. Added some gesso to parts and then color. I used the giraffe chipboard piece  from UmWowStudio. Painted him up. then stamped a couple sentiments from Viva Las VegaStamps!

Tuesday, February 14, 2017

Canvas Corp Brand Crew: Hearts will never be practical postcard

Happy Valentines day! Or as I like to call it Happy single awareness day! I tried to make a anti-Valentine's day postcard, but I don't know if it actually is. lol


I started out with the black and ivory postcard from Canvas Corp. It actually comes in a 12x12 sheet with 6 postcards on a 12z12. I gave the postcard a good spray of the Chalkboard Polka dot pink (yes I do have some other colors of tattered angles besides this one But not many. I need more! LOL) When that was dry I used DecoArt Media black gesso and black texture paste with a hear stencil. I didn't get a nice and crisp when lifting the stencil ff the postcard, but I'm going with it.

While that was drying I went looking for anti-valentine day sentiments/quotes. This one is from the "Wizard of Oz" I printed it out and glued it on the postcard once everything was dried. It needed something else So I did some splots with Lady bug Glimmer glaze and black High Impact pint. I also went around the edge of the postcard with the black.


Monday, February 13, 2017

Canvas Corp Brand: Friendship gives you wings

Its almost Valentines day and  though I'm not big fan on the day, I made a tag using Tatter Angles and Canvas Corp brand products. 


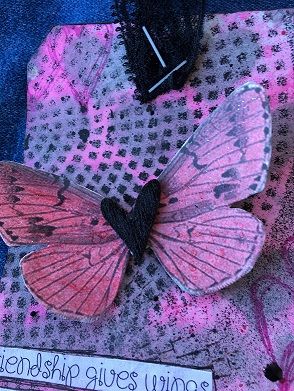
I got a tag out of my stash. I took my Fiskars cutting mat and sprayed some Polka dot pink Chalkboard and Sterling Glimmer mist by Tattered Angles on to the mat (the smooth side) I took the tag and dragged through the ink. I let it dry for a few minutes. I then took a UmWowStudio heart stencil and sprayed the Sterling Glimmer mist on the whole tag. I wanted the hearts to drip some did, some didn't. After the tag dried completely (I don't have a heat gun anymore, mine died) I did some stamping with a small heart stamp with Picked raspberry distress inkpad. I took a circle plastic canvas and sprayed Its Black Glimmer mist on it. Again I wanted drips and again it failed me. I added some splots with the Java and Polka dot pink.

While the tag dried I had butterfly (from the Tatter Angles Mixed Media Origins wings 12x12) that  had painted with Ladybug Glimmer Glaze that I was going o use on something else. I deiced to use t on the tag.  I had a bunch of heart wood veneers I took one and painted it with the Java Glimmer Glaze. When that dried, I cut the butterfly wings and glued it to the back of the heart. and glued that to the tag. 

After looking online for Valentine quotes, I found a couple I liked and printed them. One I used for this tag. I glued it on the tag and went around the words with pen. I duid glue on another tag on the back of this one tio get it more sturdy. The top part of the tag I used some black lace trim that I got in my welcome kit. I stapled it on to the tag. I went around the edge with the black  High Impact paint.


Friday, January 20, 2017

Canvas Cord Crew Friend canvas

I'm happy to announce that I was picked to be part of the Canvas Corp Brand Creative Crew! It was a complete shock.  I hoep this gets me to blog more. Its easy to just d youtube videos, and not blog my project.

Last month I was sent some goodies from them of items that I picked out and also some items they picked for us crew members. The newbies were sent a 4x4 stretch canvas to do what we want with it, to represent us. This is what I did with my canvas


I started off glue down some medical gauze. We have a lo of that stuff from my dad. I wanted more texture then I glued down some stuff that I got at the 99 cent store. I let it dry over night. 

I gessoed everything. Then took Its black Polka Dot ink Chalkboard and spayed the how thing. Then used It's Black glimmer mist and sprayed one side of the canvas and sprayed on the other side Sterling glimmer mist. While that dried I stweed what I wanted to put for the focal point
. It was a struggle.

After a few days I decided what I wanted to do. I took some chipboard from UmWowStudio and gesseoed them and then using Glitter Glaze Lady Bug, Tatter Angels High Impact paint in Hot pink and Silver.

I went through my dies (not that I have a lot of dies) and die cut the "friend" Sizzix die from a piece of white cardstock and the peace signs from memory box with the white corrugated paper both by Canvas Corp. I sprayed the peace signs in Sterling Glimmer Mist, Polka dot pink Chalkboard,  painted one with  Island Spring Glimmer  Glaze. I also sued the Island Spring on the friend die cut.

Before gluing everything down I did some splatter of white craft paint.


Sunday, August 21, 2016

Viva LAs VegaStamps! monthly challenge: The greater the storm

I'm a little late for posting for this months Viva Las VegaStamps! inspiration board challenge. It was all about bright bold colors. For me that meant taking out the  few Dylusions paints I have and play in my junk mail art journal that I made.


I used the Bubble gum pink Dylusions paint. This paint was one from a bad batch, its a little think, but wanted to use it up. Then I used Vibrant Turquoise Dylusions paint with the Wheelie mask from UmWowStudio. I used a polka dot stencil from Heidi Swap with the Crushed Grape Dylusion paint. The last stencil I used was brick type stencil that a friend cut out for me. with Americana Citron Gren.

Once dried I stamped the Sky of stars background on the page. I stamped Banksy Rain under umbrella on to the page, then on a piece of white cardstock. cut the girl and the umbrella out and glued them on the page. I stamped Banksy Girl Floating with Balloons on tissue paper and glued her on with Matte Medium.

On scrap cardstock I stamped out the sentiment "The Greater your Storm..." Before putting it on the page. I took the cut Grass dylusion spray and splattered it on the page. I then stamped single star a few times on the page. I then cut out the words apart in the sentiment and glued them on the page. I took my black Stabilo All pencil and went around the words.  The last thing I did I took a Gelato in Metallic Icing  and went around the page with it. I then took my finger to smooth it out. 


Thursday, May 12, 2016

ATC backgrounds

If you are a subscriber of my youtube channel (if your not you should be. :D) You know I've been making ATC backgrounds for a swap next year. Yes I know a year away. but I'm doing it for an event here in Vegas, Pita Fest. And during the fest there will be some swaps going on, ATC's, tags and photo mats & inserts (one of Kathy King of paper phenomenon's creations) I'm participating in the tags and ATC swap.I don't know how many are doing the swaps, but I'm making a bunch.

Like all the other backgrounds I did, I start with stuff we get in the mail from Casinos here in vegas. On one side I glued napkins, the other side, book paper. then I gesso both sides. From there I use different colors of craft paints. and stencils. In this batch of the video I did, I used DecoArt craft paints. Also used Various stencils. The video of me doing these will be out June 11. :)


Americana paints used:
Margarita
Citron Green
Bahama Blue
Calypso Blue
Peacock teal
Dragon Fruit
Lemon Yellow
Snow White
Lamp Black

Stencil used:
Americana stencil: Dangles
prima stencil. I don't know the name of it.
Dina Wakley: Spinners
Andy Skinner: Alphabet spaghetti and Snake's web


Tuesday, October 6, 2015

Everyone wants a Pumpkin Spice Latte

I've been sick almost all last week with a stomach bug.So I haven't done any art for a while. Yesterday was the first time I did anything since was sick (well beside Sunday at Art Journal class with DeeDee. LOL) I did a journal page in my Dylusion Journal for October's inspiration board challenge on the VLVS! Blog.


I started the page with using a piece of 12 x 12 that I used to cut with my Cameo donuts. I thought the circles would make a cool stencil so I kept it and that's what I used for the page. I used the Squeezed Orange Dylusions spray. I then took Gathered Twig Distress ink pad and a foam applicator and put ink between the circles and on the edges. then I took my spray bottle and sprayed the page. Left it sit for a few seconds then took a paper towel and blotted the water off. I did that a couple times. I let that sit to dry.

I stamped Humpty Dumpty on cardstock with black archival ink pad. Colored him with pearlesent water colors. Set him to dry. 

After the page dried I stamped the brick background stamp with the Gather Twig distress ink pad.  I then took the brick stencil from UmWowStudio placed it in the corner of the page. I used DecoArt Black molding paste. Then I let it sit to dry. After it dried I used the Tree Background  and black archival ink pad and stamped the tops of the stamp on the top of the brick wall ( I tried to cover u a boo boo with the texture paste. lol) I also used the spiked fence stamped at the side of the brick wall. To compete the scene I used the flock of bats, full moon and the hang on witch stamps. 

I thought Humpty need to hold something and I saw one of the coffee to go cups that I cut on my Cameo. I colored the sleave with orange gel stick by Faber-Castell. Then pieced it together and glued it to Humpty. Then put him on the great wall. Lastly I wrote out the sentiment for the page on white cardtock and black pen.  Cut and glued on page and went around them with my black Stabilo pencil.


Sm;)e

I'm still on an ATC kick. I have a lot of starters. I did 2 more yesterday.


Yesterday I was playing with black cardsock 65 lbs from Recollections and my Dylusion paints.After seeing the new 8x8 square black Dylusion journal and how cool her paints looked on the black paper, I wanted to see how they would look on the back cardstock I have in my stash. The paint look so cool on the black cardstock.

I used the Harlequin stencil from UmWowStudio and the Crushed grape and Vibrant Turquoise. While that was drying, I took one of the mini Polaroids Chipboard from UmWowStudio and with my pallet knife I used some DecoArt white gesso on it. I then used my fingers to make some texture and set it to the side to dry. Didn't take long. After it dried I used Black Soot distress ink pad and rubbed it on the chipboard. I took my waterbrush to it. I wanted the texture to show more so I went over it again with the black soot.

I stamped the Rabbit wearing Sunglasses from Viva Las VEgaStamps! and stamped him on white cardstock in Black Archival inkpad. One of his lens on his sunglasses didn't stamp clean, so I used a black pen and colored it in. I used Neo Color 2's and painted his sunglasses, nose, and inside ears. I took the chipboard piece and glued it onto the cardstock with Aleene's tacky. then trimmed the paper. then glued the Polaroid to the ATC. I edge the Polaroid in Lamp (ebony) Black craft paint by Americana. I rounded the corners with my WRMK corner rounder. I stamped the Smile stamp on the ATC in Black Archival ink pad. I then back the atc on to cereal weight chipboard.


This background was a cut off from a journal page I did in Art Journal class. The possess I did for this mini Polaroid is the same thing I did to the one above. But I used Picked Raspberry and spun sugar Distress ink pads. then used my water brush to blend. Then I used Black soot to pick up the texture of the gesso. I stamped the Flamingo and Skinny Girl on white cardstock with black Archival ink pad. Colored the Flamingo with Neo Color 2's and colored the skinny girl with my Koi watercolors. Glued the Polaroid to the paper then cut trimmed.  Edge with the Lamp black craft paint. Glued to the ATC. Stamped the Sm;)e stamp on the the background. Used the corner rounder on the corners.

Thursday, May 21, 2015

Everything has beauty

Okay this post is a little late, but better late then never. :)This is another art journal page that I did at the Art journal class with DeeDee Catron taught last month. DeeDee is now starting to put the classes up on video that can be found here, so those in other states or countries can check out the classes. And the price is cheap 2  video classes for $10! that's $5 a class!

Here is the background Using gesso star confetti stencil and star chipboard confetti by UmWowStudio. Also gray and pink (shocking craft paint). It was our homework to finish the page after we did the background 


Close up

Here is the finish page in my journal.  


I still had the butterflies we used for the gel medium transfer journal page from the begining of the year so I cut some of those out and did a transfer with them. I then stamped the wildflowers silhouette  from Viva Las VegaStamps! on the bottom of the page with Versafine ink pad. I then used Ultra High Gloss clear embossing powder on the wildflowers. It needed something else on the page. I took some  Daler Rowney FW artist acrylic ink in Process Magenta, put a few drops in my paint pallet and add some water and made some splots all over the age. I then cut the paper to fit the journal pages. I used Miracle tape and Glue. I then found a qute wrote it on a piece of scrap paper, glued it on the page and then outlined it with my black Stabilo pencil.